Hello guys! welcome to your first HTMX tutorial to build your HTMX todo list app. I hope you have no prior background in HTMX. You don’t know what it is and you don’t know about Flask and any kind of back end technology at all. What you are expected to know is a little bit of python and HTML. That’s it. If you know these you are ready to go. So without further talking, let’s get started.

What is HTMX?
With the recent advancement in Single Page Application (SPA) technology, the old monolith architecture based website structure has started to begin disappearing. Well, if you don’t know what a monolith website is, it simply means the page is loaded fully from the server and anytime any update is there, you need to get the full page re-rendered from the server. That’s really cumbersome. It’s bad for a several reasons.
Performance
When the full page is reloaded, we also reload a lot of other things that aren’t really needed to be reloaded. Often times, either they are exactly the same or unnecessary. Think of a chatting application, where you have sent a message and a little tick mark appears below your message indicating that the recipient user has seen your message.
But if you are using a monolith application you have to reload the full page including the header, the full website page, the previous messages and every other things that is rendered on the page in order for just to view that little tick mark.
Not only it requires more bandwidth usage but also it makes the website very slow and thus the user experience very poor. While using HTMX, we don’t reload the full page for every of our needs. We will load only the part of the page that’s necessary for us as we will see later in this tutorial.
We enjoy typing
When we create application in a monolith structure the business logic part is generally tightly coupled with the view or template part of the website.
So, when we need to change the view or business logic we have to carefully do it or otherwise, we may crush the whole application.
Although many popular MVC frameworks exists to resolve this issue, this still remains a major issue. We should avoid typing less and shouldn’t repeat same kind of code over and over again.
Why not React / Vue / Svelte etc. frontend frameworks?
While choosing a frontend library or framework library like React / Vue or Svelte can be a great choice for developing a single page application, we prefer HTMX due to it’s simplicity and easiness to get started. We don’t need to create an intermediate API for our application. HTMX is a great choice when there is a shortage of time but we need to create a reactive application with minimal effort.
What is Flask?
Flask is a lightweight python library that will allow us to create HTTP server and routing with a few lines of code. Static HTML pages can also be used in HTMX but as we are creating a todo list application, we should choose a dynamic server instead. So we will start by creating a Flask server that will serve our pages.
The Steps to create HTMX Todo List App
No more waiting. Follow these steps to jumpstart your application
Step 1 – Installing Flask
Flask is available in the PyPI index. Open your Command-Line if you are using windows, or Terminal if you are using Linux / Mac / BSD or other UNIX based systems. From there write the following command to install Flask library,
pip install FlaskAfter you install Flask, it should be available in your system. Open python shell and test the following code to check if it has installed properly.
>>> import flask
>>> print(flask.__version__)
3.0.3
It should print the version of Flask installed on your computer. It may not match exactly with mine, but it’s completely fine.
Step 3 – Creating a basic server
Write the following code in a file named index.py in an empty folder. Make you sure no other file exists in the same folder.
from flask import Flask

app = Flask(__name__)

@app.route("/")
def index():
    return "<b>Hello World!</b>"
Let’s understand the code step-by-step. The first line imports the Flask class from the flask module. This class means our entire WSGI application (don’t be overwhelmed by the word WSGI just consider it as the server. It’s not really required for you to know this for this tutorial). Next, we create an instance of it called app.
But this app doesn’t yet know what to listen for and which URL to listen to. So we use a function called index (you can name it whatever you want, it doesn’t really matter) which will listen to the root URL (/) and respond with <b>Hello World!</b> in html which is bolded text Hello World! in HTML. We tell it to listen to / by the decorator @app.route('/')
Not let’s run the application. Run the following command from the same folder from Command Line or Terminal,
flask --app index runThe index here must match with the file name. Don’t confuse it with the index function. It should start an HTTP server at port 5000 or any other port if the port is busy. Look at the Command Line output to know the correct location.
 * Serving Flask app 'index'
 * Debug mode: off
WARNING: This is a development server. Do not use it in a production deployment. Use a production WSGI server instead.
 * Running on http://127.0.0.1:5000
Press CTRL+C to quit
127.0.0.1 - - [27/Jan/2025 09:56:12] "GET / HTTP/1.1" 200 -
127.0.0.1 - - [27/Jan/2025 09:56:13] "GET /favicon.ico HTTP/1.1" 404 -
As you see from the output above, for me it’s http://127.0.0.1:5000. It displays the desired page,

Voila! But Hello World! is not the thing we are here for. We want to create a to do list application. Right? So let’s modify the code. We begin by adding a list that contains a few tasks that has not been yet completed. They are hardcoded into the code but are just for you to understand the structure of the data.
They will be removed later as no ToDo app list app should include tasks from the beginning. They should only be there if you inserted new tasks. But just for the sake of understanding and writing the initial page structure, they are useful. Write the following lines after the import statement,
tasks = [
    {
        "id": 0,
        "name" : "Task 1",
        "completed" : False
    },
    {
        "id": 1,
        "name" : "Task 2",
        "completed" : True
    }
]
Now let’s update the index function to render a full HTML page showing all the tasks and their status.
@app.route("/")
def index():
    # Prepare the header
    body = """
    <html>
        <head>
            <title>ToDo List Application</title>
        </head>
        <body>
            <h1>Tasks</h1>
            <ul>

    """

    # Add each of the tasks to the response
    for task in tasks:
        body += f"""
            <li>{task["name"]} | {"Completed" if task["completed"] else "Pending"}</li>
        """

    # Add the footer
    body += """
            </ul>
        </body>
    <html>
    """

    # Return the response
    return body
Restart the app again if it’s running. You can press Ctrl+C to quit the previous process and the run same command again to run the modified code. Now it’s showing all the tasks with their status in the browser window.

Great! it’s time to add more functionalities now. We should be able to add more tasks, mark existing tasks as completed and delete the existing tasks. Before that, we need to get a little familiar with various kinds of HTTP requests.
Step 4 – Understanding different HTTP methods
The HTTP listener so far has listened to GET requests. But there are some other requests also. Everything on the HTTP protocol can be considered as resources. In this case, these are tasks. And different HTTP methods are used to manipulate these resources.
- GET Requests: GET requests are usually read only request to read the description of one or more resources from the server. In this case, we were fetching the information for the tasks.
- POST Requests: POST requests on the other hand, is used to create new resource on the server. That will be helpful in the future when we will create a new task through our application.
- PUT Requests: PUT requests are used to replace existing resource with a new resource. This is useful when we update or modify existing resource. This will be useful if we want to modify an existing task name and status.
- PATCH Requests: You can think of PATCH requests to be slightly advanced version of PUT requests. These are required when you need to update a slight portion of the resource instead of replacing the whole data. For example, in our case changing the status of a task.
- DELETE Requests: This is pretty self-explanatory. In this case, we will use it to delete an existing task.
Step 4 – Introduction to HTMX
HTMX is actually quite simple to understand. Let’s add HTMX header from CDN to the head. Modify the index function to add the <script> tag just before the </head> (closing tag). Copy this and paste it there,
<script src="https://unpkg.com/htmx.org@2.0.4"></script>But before we begin, let’s create a dummy URL endpoint, that will come useful in just a few minutes. Write the following function above the previous index function.
@app.route("/dummy")
def dummy():
    return "dummy"
It will just render a dummy text. Now rewrite the li element inside the index function like this,
<li>
    {task["name"]} | {"Completed" if task["completed"] else "Pending"} |
    <button hx-get="/dummy">Delete</button>
</li>
Notice the button with delete as its text here. It has an hx-get tag. It’s not any built-in HTML tag. Indeed it’s a feature of HTMX. You can interpret it as when clicked, load the /dummy endpoint and instead of reloading the whole page with the GET response, replace the button instead. Isn’t that great?
Let’s run and click on the button on it.

After clicking the Delete button of the Task 1, it replaced the innerHTML of it with the response. But it’s still a button. Wouldn’t it be better to replace the whole button instead? In other words, the outerHTML.
Actually that’s quite easy. We have to provide one more argument to it. That is the hx-swap argument. When not provided, HTMX considers the default value as innerHTML. Let’s change it to outerHTML. So modify the code inside index fucntion again.
<li>
    {task["name"]} | {"Completed" if task["completed"] else "Pending"} |
    <button hx-get="/dummy" hx-swap="outerHTML">Delete</button>
</li>
Let’s run and try clicking again

Working as expected. But did we really want that? No, we want the item to be deleted. So let’s rename the dummy function to delete and also change the URL too. As it’s deleting a task it should be better to use a DELETE request instead of a GET request. And it also should take id as the parameter so that it can understand which task to delete.
@app.route("/delete/<int:task_id>", methods=['DELETE'])
def dummy(task_id):
    global tasks
    tasks = [task for task in tasks if task["id"] != task_id]
    return "Deleted"
As we are using DELETE request and passing the id, we need to modify the HTML code in the index function also. Let’s do it
<li>
    {task["name"]} | {"Completed" if task["completed"] else "Pending"} |
    <button hx-delete="/delete/{task["id"]}" hx-swap="outerHTML">Delete</button>
</li>
Let’s run it again and try clicking again.

We’ve deleted Task 2. Let’s reload the page by clicking on the browser reload button

Hurray! Task 2 is successfully deleted. You might be wondering and thinking “Wait man! You told me that HTMX is used to prevent full HTML page reload. But now you are reloading the whole page manually? What’s the point of using it then?”
Yes, you are correct. But we will solve it now and HTMX has a perfect solution for it. We need to change the hx-swap to delete from outerHTML. But this still remains a problem as it would delete the button, not the entire li element. But we can do it too using the hx-target attribute.
It can contain many values like next <selector>, previous <selector>, closest <selector> etc. Look at the documentation for more details. We are gonna set it to closest li meaning that it will delete the closest ancestor of the delete button which is a li element.
<li>
    {task["name"]} | {"Completed" if task["completed"] else "Pending"} |
    <button hx-delete="/delete/{task["id"]}" hx-swap="delete"
        hx-target="closest li">Delete</button>
</li>
Step 5 – Adding the Insert Task and Edit form
Now that we have implemented the delete part successfully, we can add the add task form below the task lists. Let’s go and edit the index function. Just under the </ul> closing tag, add the following form in the footer part in the index function,
body += """
        </ul>
            <form hx-post="/add">
                <h3>Add New Task</h3>
                <label for="task_name">Task Name</label>
                <input type="text" name="task_name" />
                <button type="submit">Add</button>
            </form>
        </body>
    <html>
    """
Note that, we didn’t use method attribute here in the form because the hx-post specifies this already. The /add endpoint has not been implemented yet.
Let’s implement it now. Before that import the request variable from flask along with Flask class in the first line which will be required to get POST inputs from the form,
from flask import Flask, requestsNext, implement the /add endpoint,
@app.route("/add", methods=['POST'])
def add():
    new_id = 1
    for task in tasks:
        if task["id"] == new_id:
            new_id = new_id + 1
    new_task = {
        "id": new_id,
        "name": request.form["task_name"],
        "completed": False
    }
    tasks.append(new_task)
    return f"""
        <li>
            {new_task["name"]} | {"Completed" if new_task["completed"] else "Pending"} |
            <button hx-delete="/delete/{new_task["id"]}" hx-swap="delete"
                hx-target="closest li">Delete</button>
        </li>
    """
As both the /add endpoint and the form has been completed, we are ready to test it. Let’s run
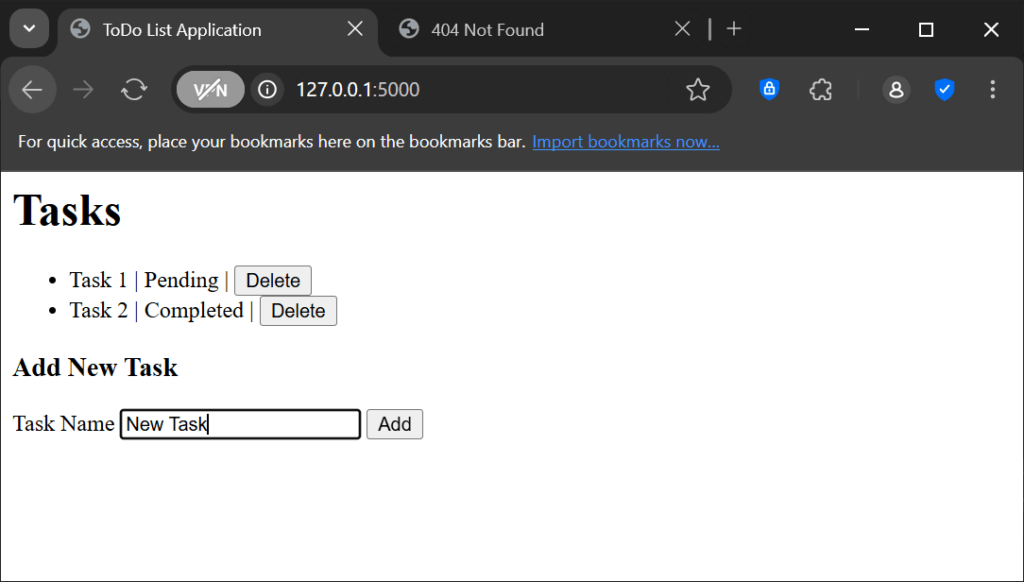
After we click on the Add,
The form gets replaced by the new Task li element returned by the /add endpoint. But that’s not a good behavior for a todo list application. We want the form to remain there and the new li element to get added to the existing list.
In fact, we can do that very easily by setting the hx-target group to the ul element (by adding an id to it) and hx-swap attribute to beforeend meaning that it will be added just before the </ul> closing tag.
Set the id attribute of ul element inside the index function so that it can be used later in the hx-target in the form,
<ul id="list">Now change the hx-target and hx-swap of the form,
<form hx-post="/add" hx-target="#list" hx-swap="beforeend">
<h3>Add New Task</h3>
<label for="task_name">Task Name</label>
<input type="text" name="task_name" />
<button type="submit">Add</button>
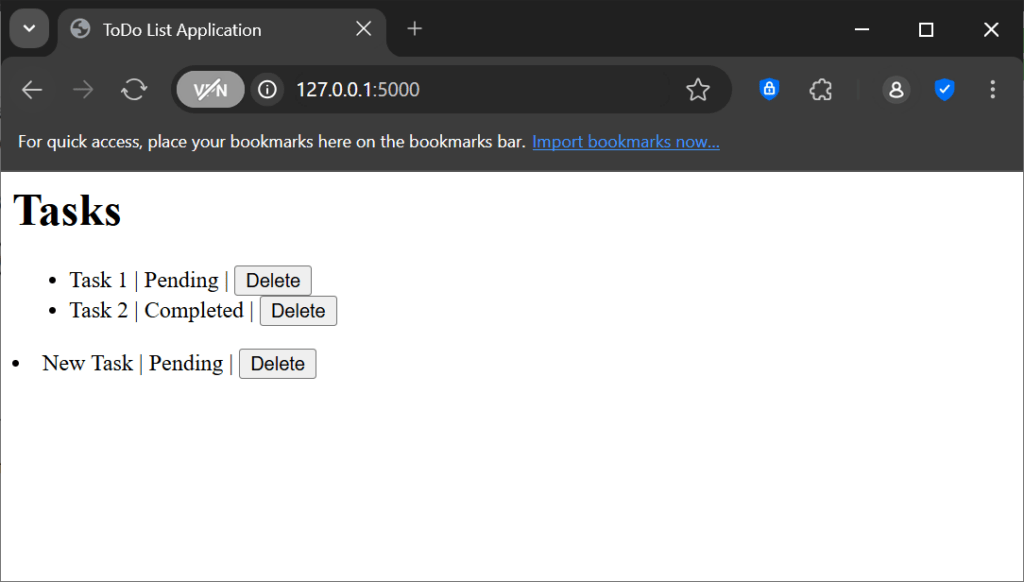
</form>Now let’s add some tasks using the form.

Working perfectly! That was a huge step. Hold a cup of coffee and enjoy the rest of the tutorial. We are gonna finish it off now by implementing the edit form and it will be of a great user experience!
Now, let’s add a new /edit endpoint that is gonna edit a task provided that a task exists with the given id. It will listen to both GET and PUT requests. In the GET request, it will render the form to edit the task and in the PUT request, the modification to the tasks list would be done.
@app.route("/edit/<int:task_id>", methods=['GET', 'PUT'])
def edit(task_id):
    selected_task = None
    for task in tasks:
        if task["id"] == task_id:
            selected_task = task
            break

    if request.method == "GET":
        return f"""
            <form hx-put="/edit/{task_id}">
                <h3>Add New Task</h3>
                <label for="task_name">Task Name</label>
                <input type="text" name="task_name" value="{selected_task["name"]}" />
                <label for="task_completed">Completed</label>
                <input type="checkbox" name="task_completed" value="yes"
                    {"checked" if selected_task["completed"] else ""} />
                <button type="submit">Edit</button>
            </form>
        """

    elif request.method == "PUT":
        selected_task["name"] = request.form["task_name"]
        completed = request.form.getlist("task_completed")
        if len(completed) > 0 and completed[0] == "yes":
            selected_task["completed"] = True
        else:
            selected_task["completed"] = False
        return f"""
            <li>
                {selected_task["name"]} | {"Completed" if selected_task["completed"] else "Pending"} |
                <button hx-delete="/delete/{selected_task["id"]}" hx-swap="delete"
                    hx-target="closest li">Delete</button>
                <button hx-get="/edit/{selected_task["id"]}" hx-swap="outerHTML"
                hx-target="closest li">Edit</button>
            </li>
        """
Note a few things here. First of all, we used request.form.getlist method instead of accessing the value directly. The reason is that there can be multiple checkboxes in the form. So directly accessing it using [] would raise exception. Secondly, we added an edit button which will replace it with the edit form. The edit form will also return the response as the generic list item. Thus it will work great together.
Let’s try running it

Click on the Edit button,

Rename the task name and status to anything dummy. and click on edit.

Great! we have completed our Todo list app in HTMX. It’s working pretty good
Step 5 – Enjoy and polish the app
Although the app is working great, you can add database and styles to the app. It’s looking pretty generic. But you have all the basic tools you need to get started with HTMX and flask app
Further Reading
It was a great tutorial for a beginner to get started the journey to HTMX. However it’s not the end of the world. You can read a lot and learn from other places too. Here are some suggestions:-
- The Official HTMX Documentation
- Hypermedia Systems by Carson Gross, Adam Stepinski (Check out at Amazon)
Frequently Asked Questions
Will HTMX replace React / Vue or modern frontend frameworks?
Not at all. HTMX is never meant to be a complete frontend framework that is gonna replace reactive component libraries. It’s only a rapid frontend development tool for simplicity and faster development time.
Does HTMX work only with Flask and Python
No, HTMX can work with any backend technology. You can use it with FastAPI, Django, PHP, Golang or whatever you wish and you are welcomed to use it.
Final Note
Thanks for your patience to make it to the end. You made a long journey. I would suggest you to practice more, gain a better software engineering experience, and explore the documentation. See you soon in a new article. Thank you very much once again.


Signed up within seconds.
For the reason that the admin of this site is working, no uncertainty very quickly it will be renowned, due to its quality contents.
Thank you for sharing your personal experience and wisdom with us Your words are so encouraging and uplifting
“Cloud startups streamline workflows with Kubernetes-managed container orchestration.”